Module de planification orthodontique
Modules
Sur la base de résultats du module Segmentation, diverses options de traitement orthodontique peuvent être planifiées de façon virtuelle. Selon la version du programme, différents modules sont disponibles, dont les fonctions peuvent être appliquées séparément ou en combinaison les unes avec les autres sur les données du patient.
- Module Aligner 3D
- Module FA_Bonding 3D
- Module Wire_Bonding
- Module Bonding Tray 3D
- Module Bracket Erase
- Module Retainer 3D
- Module ORTHO APPS
- Modules Sim 3D, Waefer Creation 3D
Planification du traitement virtuel pour aligneurs
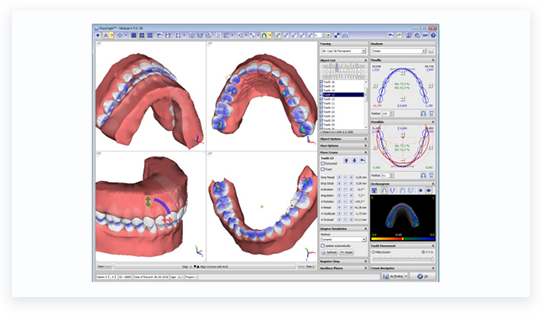
Le module Aligner 3D est utilisé pour planifier des traitements par aligneurs. Il permet la subdivision des mouvements dentaires planifiés en une série d’étapes individuelles. Si des taquets doivent être rajoutés, ils peuvent être sélectionnés et positionnés à l’aide de la bibliothèque de taquets interne. Aussi, OnyxCeph³™ vous donne la possibilité de créer vos propres taquets.
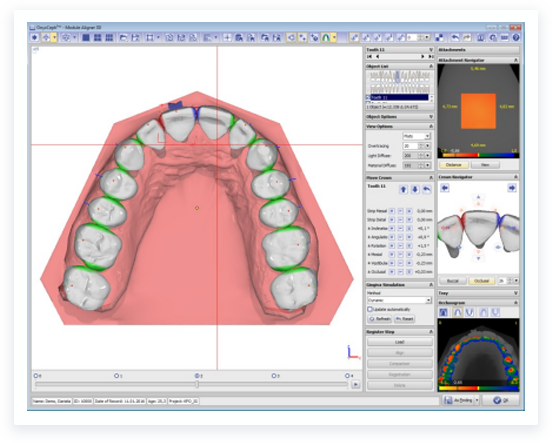
Aligner 3D module
Le module Aligner 3D vous permet d’actualiser votre plan de traitement à tout moment avec un scan et de suivre l’évolution du traitement en tenant compte de l’objectif initial. Cette option exceptionnelle d’actualisation du plan de traitement permet de charger un scan intermédiaire de la progression réelle du traitement dans la planification initiale afin de contrôler le mouvement des dents obtenu et de mettre à jour la planification virtuelle tout en conservant l’objectif de traitement initial.
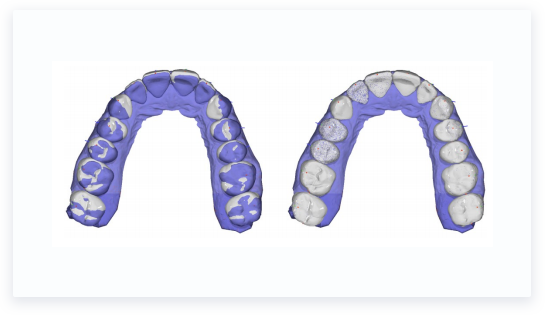
Ajuster le planning (en blanc) à la progression du traitement réellement
réalisée (en bleu) à l’aide de l’affinement progressif
Positionnement de brackets sur la malocclusion
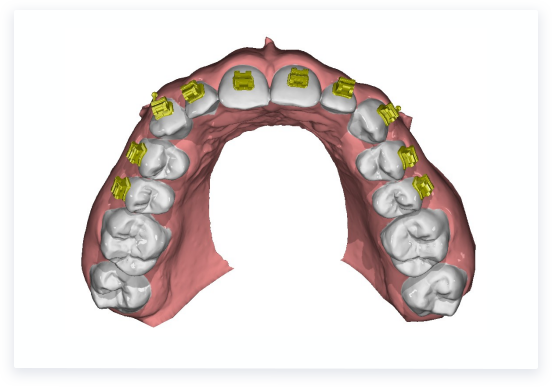
Dans le module FA_Bonding, des brackets peuvent être attribués aux couronnes individuellement ou par groupes préconfigurables à partir de la bibliothèque de brackets onyx locale ou en ligne pouvant être mise à jour.
Le placement par rapport à la couronne est effectué conformément à la règle empirique sélectionnée à l’aide des coordonnées de la couronne attribué dans le module et des paramètres des brackets correspondants. De plus vous pouvez enregistrer vos propres ègles de hauteurs de liaison incisives.. Les règles pré-installées sont:
OnyxCeph.™
MBT
Muchitsch
Creekmore
Andrews
Alexander
Option LineUp permet de prévisualiser et de modifier la relation bracket-couronne alignée dans un emplacement sur un fil virtuel présélectionné
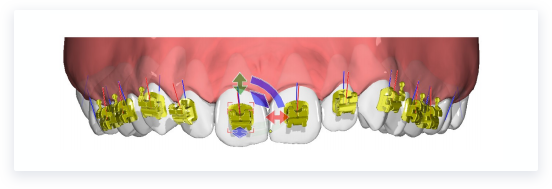
Positionnement des brackets selon la règle OnyxCeph³™. Préinstallée et la
correction manuelle via In-View NavigatorPositionnement du bracket selon l’objectif du traitement
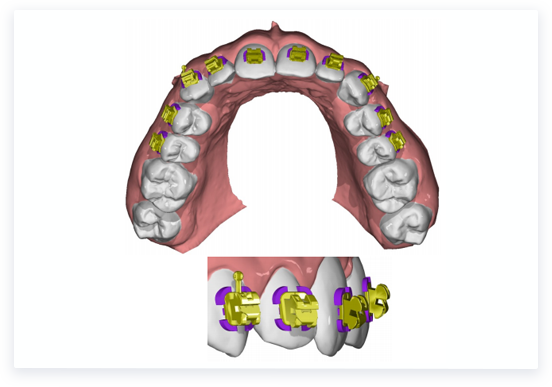
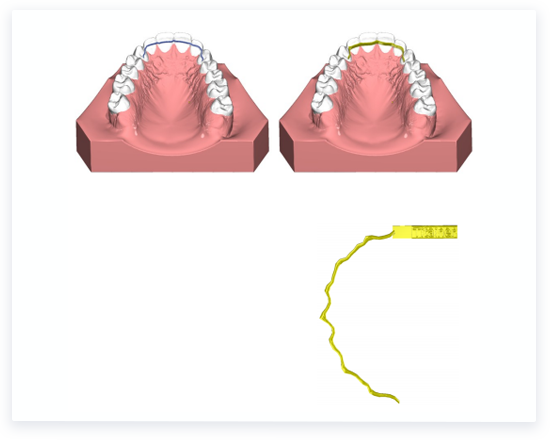
Dans le module Wire_Bonding, vous pouvez choisir le tracé du fil par rapport à l’arcade dentaire concerné.. À cette fin, les deux fils sont automatiquement prépositionnés à l’aide des points FA des deux arcades. Il vous est possible de corriger ce positionnement dès le début ou à tout autre moment, après quoi toutes les données dépendant de cette planifiction sont mises à jour immédiatement.

Wire_Bonding module
À toute étape de la planification, le mouvement de chaque dent prise en compte dans le set-up peut être appliquée en sens inverse aux couronnes et aux brackets pour visualiser la position du fil droit prévue sur lesbrackets dans la phase de traitement initiale.
Positions de brackets prévues selon l’objectif de traitement et transformé
au stade initialConception de la gouttière de transfert à imprimer
Une fois que vous avez positionné virtuellement les brackets virtuels sur le modèle de malocclusion grâce aux modules de planification FA_Bonding ou V.T.O.3D / Wire_Bonding, il vous reste à transférer ce placement virtuel au patient de la manière la plus simple, rapide et précise possible. Pour cela, OnyxCeph. ™ vous permet d’utiliser plusieurs techniques de collage indirecte avec des modules distincts:
Module Kylix
Module Bonding Trays
Méthodes de transfert des positions de bracket planifiées
Module Kylix
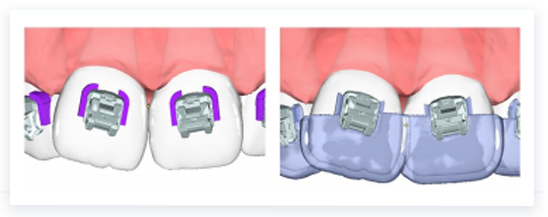
Avec le module Kylix 3D, la position du bracket sur l’arcade dentaire imprimée peut être prédéfinie au moyen de marqueurs flexibles autour et en dessous de la base du bracket pour la fabrication des gouttières de transfert au moyen de la technologie de thermoformage.
Définition de la position et de l’alignement du bracket à l’aide de repères de base
Module Bonding Trays
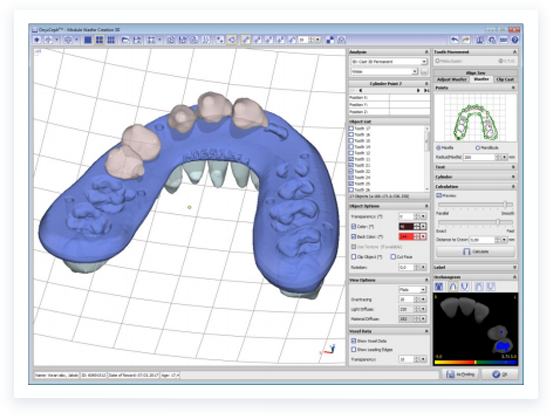
Dans le Bonding Trays module, différents types de bracket transfer trays peuvent être conçus sur des arcades virtuels avec brackets grâce à divers paramètres afin d’être ultérieurement fabriqués par fraisage ou impression 3D.
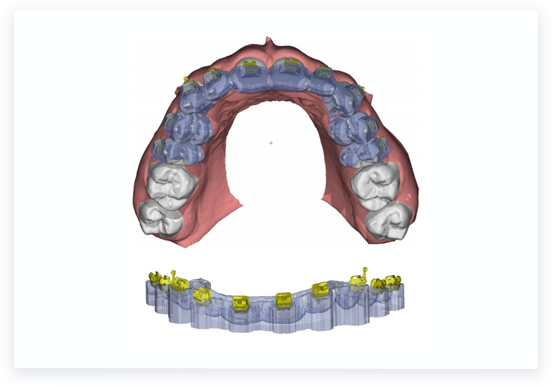
Bracket transfer trays conçu sur un modèle virtuel avec brackets
Elimination des brackets virtuellement
Pour les corrections dentaires finales avec les aligner trays à la fin d’un traitement multi-attaches, ivous pouvez retirer virtuellement les brackets contenus à partir d’une empreinte numérique. Vous pouvez le faire grâce au module Bracket Erase en remplaçant la zone de brackets marquée automatiquement ou manuellement par la géométrie de la couronne segmentée à partir de la numérisation initiale..
Sur la base de ce résultat vous pouvez planifier un traitement de finition grâce au module Aligner 3D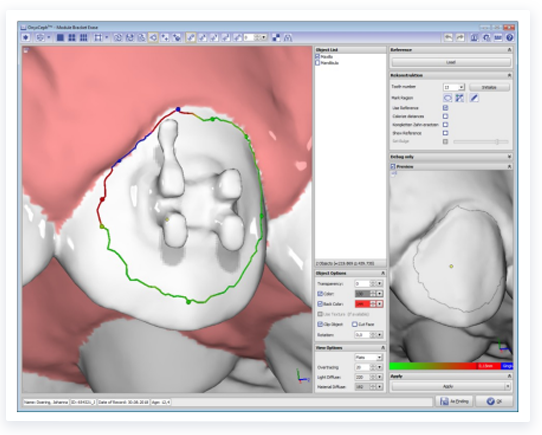
Bracket Erase module window
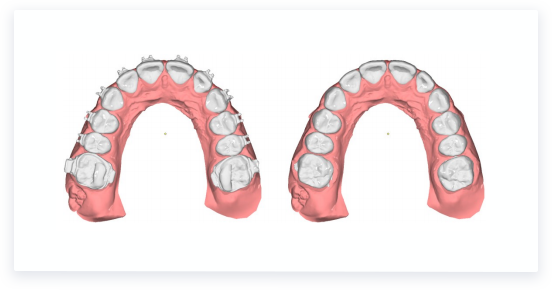
Fin de scan avant et après le retrait virtuel des brackets et des bandes
Planification virtuelle de l’appareil de contention
Module Retainer 3D fournit des outils de conception intuitifs pour la création d’appareils de contention, qui peuvent être exportés dans un format de données qui convient à de différentes approches de fabrication.
Exemple d’une conception d’appareil de contention CAO
Confection d’orthèses
Le module ORTHO APPS vous offre une riche fonctionnalité pour des corrections de position automatiques et interactives des dents sur un modèle numérique segmenté.
En mettant l’accent sur des critères ortho- et prosthodontiques reconnus l’occlusion et l’articulation mandibulaire. Il vous suffit de d’appliquer différentes étapes dans un ordre logique du flux du travail. Le module V.T.O met à votre disposition une multitude d’outils d’interaction vous permettant d’individualiser la planification afin de traiter les cas allant du plus simples aux plus complexes.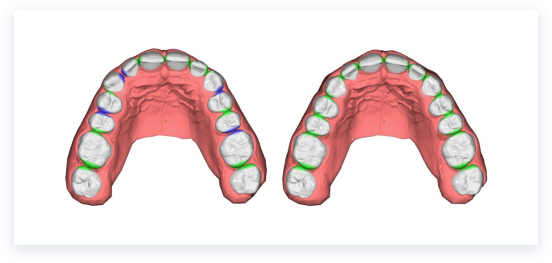
Comme pour tous les autres modules de planification 2D et 3D, les étapes intermédiaires ainsi que les résultats finaux d’une planification de set-up peuvent être enregistrés en tant que projet, envoyés en ligne pour validation et approbation ou enregistrés en tant que résultat séparé dans la base de données pour une utilisation ultérieure dans d’autres modules. Une animation peut être créée pour les résultats exportés à partir du module, afin qu’ils puissent être examinés séparément en mode plein écran.
Planification de traitement chirurgicale
Vous pouvez préparer un traitement combiné orthodontique – oral-maxillo-facial grâce au module Treatment Simulation 3D. Après l’enregistrement des données individuelles , des segments squelétiques peuvent être définis et repositionnés. A cet effet, une variété d’outils de planification vous sont proposés. OnyxCeph³™ vous permet de simuler la modification de l’apparence visuelleentre la situation initiale et finale
Les situations intermédiaires et la planification peuvent être exportées sous forme de relations occlusales pour la construction d’attelle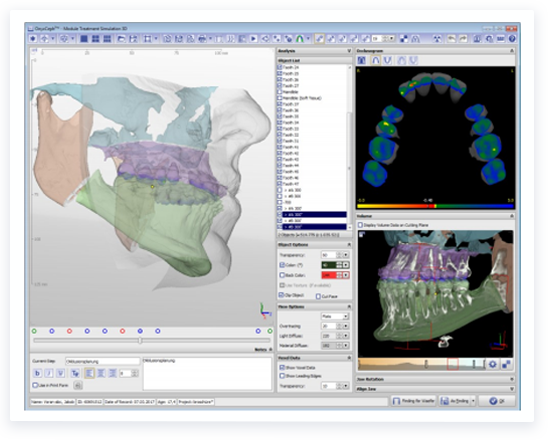
Sim 3D module window
Conception d’attelles chirurgicales: Module Waefer Creation 3D
Le module Waefer Creation 3D vous permet de créer des modèles d’attelles pour la fixation des segments de la mâchoire supérieure et inférieure pendant la chirurgie maxillo-faciale. Il vous permet de créer des constructions spécifiques à l’aide d’outils de conception intuitifs et dotés de fonctionnalités souhaitées (trous, étiquettes, repères d’enregistrement).
Waefer Creation 3D module window
Module V.T.O.3D
Définir l’objectif du traitement virtuel: module V.T.O.3D
Le module V.T.O.3D vous offre une riche fonctionnalité pour des corrections de position automatiques et interactives des dents sur un modèle numérique segmenté.
En mettant l’accent sur des critères ortho- et prosthodontiques reconnus l’occlusion et l’articulation mandibulaire. Il vous suffit de d’appliquer différentes étapes dans un ordre logique du flux du travail. Le module V.T.O met à votre disposition une multitude d’outils d’interaction vous permettant d’individualiser la planification afin de traiter les cas allant du plus simples aux plus complexes.A toute étape de la planification, vous pouvez simuler la gencive résultant des déplacements dentaires.
Les transformations nécessaires pour chaque mouvement de dent sont enregistrées afin que la faisabilité de la planification puisse être évaluée et enregistrée à l’aide de seuils et d’analyses sélectionnées qui sont mises à jour en temps réel.Comme pour tous les autres modules de planification 2D et 3D, les étapes intermédiaires ainsi que les résultats finaux d’une planification de set-up peuvent être enregistrés en tant que projet, envoyés en ligne pour validation et approbation ou enregistrés en tant que résultat séparé dans la base de données pour une utilisation ultérieure dans d’autres modules. Une animation peut être créée pour les résultats exportés à partir du module, afin qu’ils puissent être examinés séparément en mode plein écran.
Module Aligner 3D
Planification du traitement aligner virtuel
Le module Aligner 3D peut être utilisé pour planifier des traitements d’aligners. Il est lancé avec une recherche initiale ou un objectif segmenté et permet la subdivision des mouvements dentaires planifiés en une série d’étapes individuelles. Les mouvements des dents peuvent être contrôlés séparément ou par groupes surveillés et ajustés à l’aide de limites. Si des taquets doivent être rajoutés, ils peuvent être sélectionnés, positionnés et, à souhait remplacés ou supprimés à l’aide de la bibliothèque de taquets interne. Aussi, OnyxCeph³™ vous donne la possibilité de créer vos propres taquets, et de les utiliser à votre gré.
Aligner 3D module
Le module Aligner 3D vous permet d’actualiser votre plan de traitement à tout moment avec un scan et de suvre l’évolution du traitement en tenant compte de l’objectif initial. Cette option exceptionnelle d’actualisation du plan de traitement permet de charger un scan intermédiaire de la progresseion réelle du traitement dans la planification initiale afin de contrôler le mouvement des dents obtenu et de mettre à jour le planification virtuelle tout en conservant l’objectif de traitement initial. À cette fin, l’analyse est chargée dans la planification et différentes méthodes d’enregistrement dans le modèle existant sont proposées afin que les étapes restantes puissent être corrigées selon le mouvement réel des dents.
Ajuster le planning (en blanc) à la progression du traitement réellement
réalisée (en bleu) à l’aide de l’affinement progressifModule FA_Bonding 3D
Positionnement de brackets sur la malocclusion ( Inclus dans la version LAB )
Dans le module FA_Bonding, des brackets peuvent être attribués aux couronnes individuellement ou par groupes préconfigurables à partir de la bibliothèque de brackets onyx locale ou en ligne pouvant être mise à jour.
Le placement par rapport à la couronne est effectué conformément à la règle empirique sélectionnée à l’aide des coordonnées de la couronne attribué dans le module et des paramètres des brackets correspondants. De plus vous pouvez enregistrer vos propres ègles de hauteurs de liaison incisives.. Les règles pré-installées sont:
OnyxCeph.™
MBT
Muchitsch
Creekmore
Andrews
Alexander
Option LineUp permet de prévisualiser et de modifier la relation bracket-couronne alignée dans un emplacement sur un fil virtuel présélectionné
Positionnement des brackets selon la règle OnyxCeph³™. Préinstallée et la
correction manuelle via In-View NavigatorModule Wire_Bonding
Positionnement du bracket selon l’objectif du traitement
Dans le module Wire_Bonding, vous pouvez choisir le tracé du fil par rapport à l’arcade dentaire concerné.. À cette fin, les deux fils sont automatiquement prépositionnés à l’aide des points FA des deux arcades. Il vous est possible de corriger ce positionnement dès le début ou à tout autre moment, après quoi toutes les données dépendant de cette planifiction sont mises à jour immédiatement.
Wire_Bonding module
À toute étape de la planification, le mouvement de chaque dent prise en compte dans le set-up peut être appliquée en sens inverse aux couronnes et aux brackets pour visualiser la position du fil droit prévue sur lesbrackets dans la phase de traitement initiale.
Positions de brackets prévues selon l’objectif de traitement et transformé
au stade initialModule Bracket transfert
Transfert des positions de brackets planifiées
Une fois que vous avez positionné virtuellement les brackets virtuels sur le modèle de malocclusion grâce aux modules de planification FA_Bonding ou V.T.O.3D / Wire_Bonding, il vous reste à transférer ce placement virtuel au patient de la manière la plus simple, rapide et précise possible. Pour cela, OnyxCeph. ™ vous permet d’utiliser plusieurs techniques de collage indirecte avec des modules distincts:
Module Kylix
Module Bonding Trays
Méthodes de transfert des positions de bracket planifiées
Module Kylix
Avec le module Kylix 3D, la position du bracket sur l’arcade dentaire imprimée peut être prédéfinie au moyen de marqueurs flexibles autour et en dessous de la base du bracket pour la fabrication des gouttières de transfert au moyen de la technologie de thermoformage.
Définition de la position et de l’alignement du bracket à l’aide de repères de base
Module Bonding Trays
Dans le Bonding Trays module, différents types de bracket transfer trays peuvent être conçus sur des arcades virtuels avec brackets grâce à divers paramètres afin d’être ultérieurement fabriqués par fraisage ou impression 3D.
Bracket transfer trays conçu sur un modèle virtuel avec brackets
Module Bracket Erase
Elimination des brackets virtuellement
Pour les corrections dentaires finales avec les aligner trays à la fin d’un traitement multi-attaches, ivous pouvez retirer virtuellement les brackets contenus à partir d’une empreinte numérique. Vous pouvez le faire grâce au module Bracket Erase en remplaçant la zone de brackets marquée automatiquement ou manuellement par la géométrie de la couronne segmentée à partir de la numérisation initiale..
Sur la base de ce résultat vous pouvez planifier un traitement de finition grâce au module Aligner 3DBracket Erase module window
Fin de scan avant et après le retrait virtuel des brackets et des bandes
Module Retainer 3D
Planification virtuelle de l’appareil de contention
Module Retainer 3D fournit des outils de conception intuitifs pour la création d’appareils de contention, qui peuvent être exportés dans un format de données qui convient à de différentes approches de fabrication.
Exemple d’une conception d’appareil de contention CAO
Modules Sim 3D, Waefer Creation 3D
Planification de traitement chirurgicale
Vous pouvez préparer un traitement combiné orthodontique – oral-maxillo-facial grâce au module Treatment Simulation 3D. Après l’enregistrement des données individuelles , des segments squelétiques peuvent être définis et repositionnés. A cet effet, une variété d’outils de planification vous sont proposés. OnyxCeph³™ vous permet de simuler la modification de l’apparence visuelleentre la situation initiale et finale
Les situations intermédiaires et la planification peuvent être exportées sous forme de relations occlusales pour la construction d’attelle.Sim 3D module window
Conception d’attelles chirurgicales: Module Waefer Creation 3D
Le module Waefer Creation 3D vous permet de créer des modèles d’attelles pour la fixation des segments de la mâchoire supérieure et inférieure pendant la chirurgie maxillo-faciale. Il vous permet de créer des constructions spécifiques à l’aide d’outils de conception intuitifs et dotés de fonctionnalités souhaitées (trous, étiquettes, repères d’enregistrement).
Waefer Creation 3D module window
- Module FA_Bonding 3D